
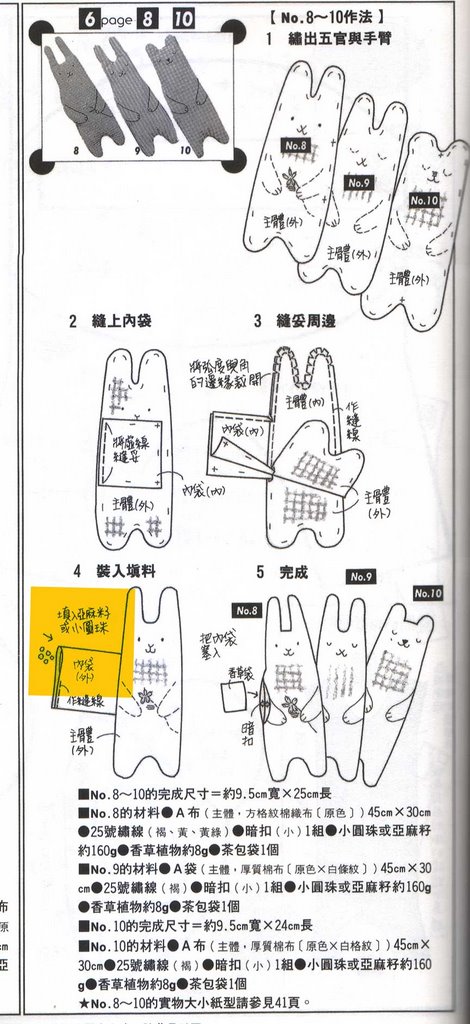
 Found this really cool softy in a chinese craft book I bought yesterday. Tried it this morning, it was pouring and it was a lovely rainy day project that took less than an hour and a half. You have the option to stuff the body with wheat (if you are making a wheat heat bag) and the outer bag with potpourri, or with fibers on the body and stuff the outer bag with the wheat instead (Remember to only heat the outer bag then only insert it into the side pocket of the body). Here, I use rice, since it's my first one.
But first, do download the instructions and the template I drew. (Sorry the instructions are in chinese - but the diagrams are quite useful. The 'Size' is totally up to you)
STEP 1
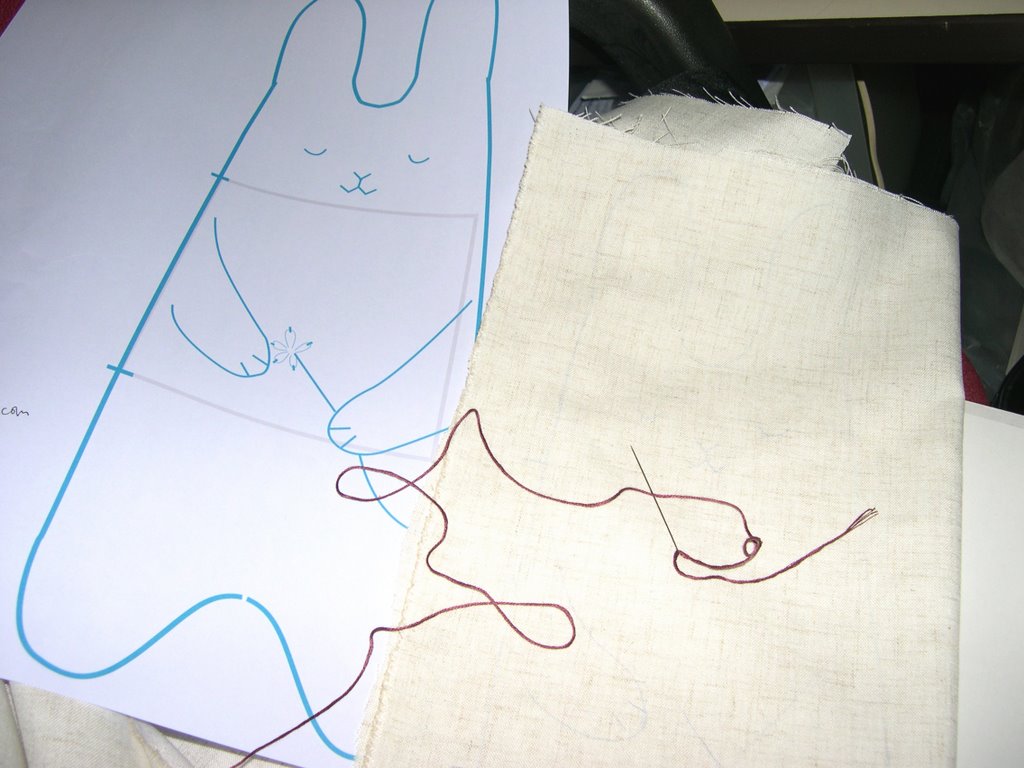
Fold the material into half and Trace the outline of the template on one side. Embroider hands, eyes, features and flower.

STEP 2
Remember to cut 2 squares for the pouch, as shown in grey on the template.
STEP 3
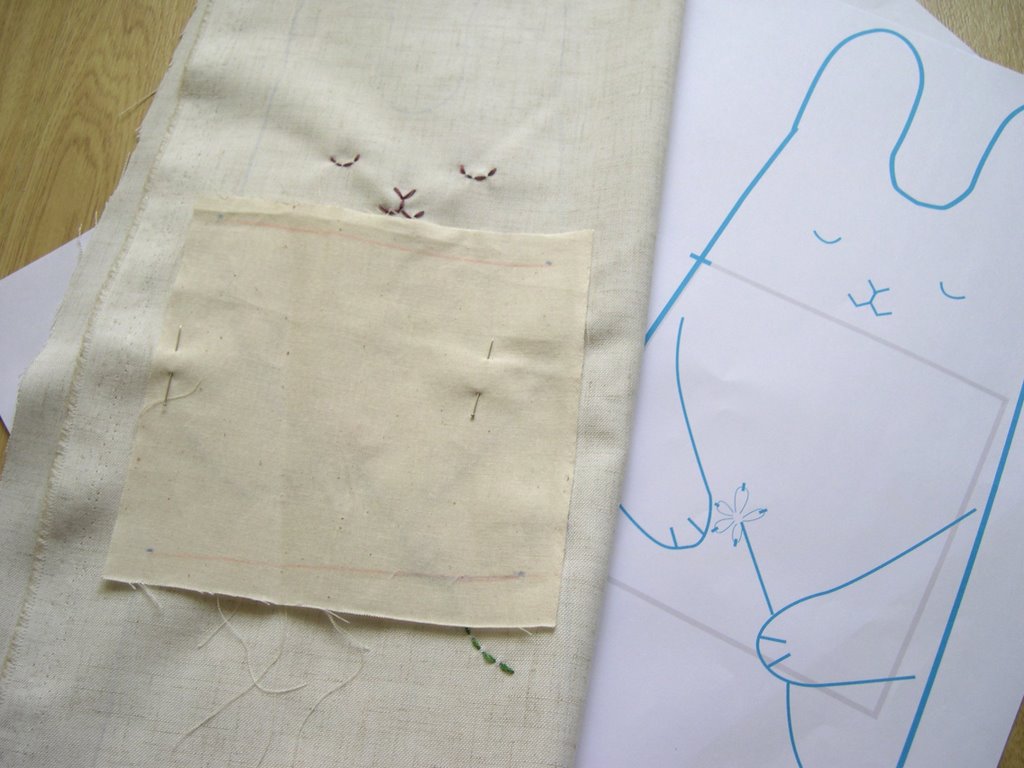
Pin square 1 to the opening, in front of the embroidery marked on the template. Making sure you have enough material on the left.
Pin square 2 to the exact opposite side of the material.
 STEP 4
Sew the individual squares to the opening only as indicated on the template (ref. the chinese instructions). And on the other side of the material.
Reverse the material and meet the pouch squares together. Pin and begin to sew along the outline. Leave an opening at the pouch for filling.
STEP 5
Trim the fabric and snip like crazy on the edges and the corner of the pouch where the bends are. This will decrease bunching on the inside.
STEP 6
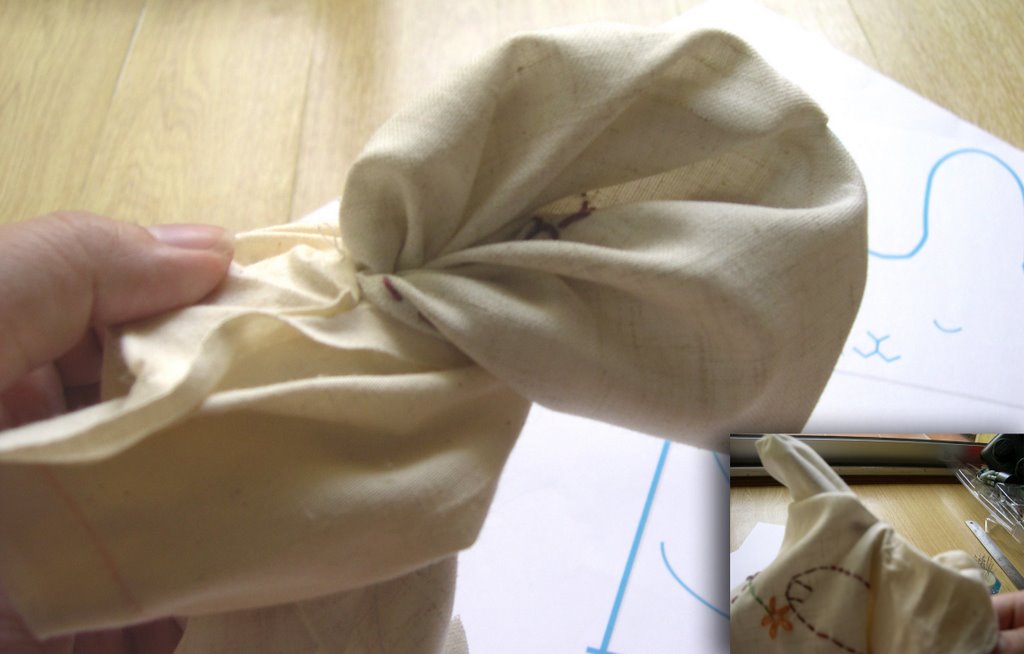
Invert. Make sure you do not tug at your embroidery by mistake.
 STEP 7
Fill it up with fiber, or if you prefer, wheat (if you intend to make a heat bag : Make sure everything is 100% cotton to avoid a nasty meltdown in the microwave oven.) Concentrate on the ears and the legs of the Snoogem. Do not overstuff, bear in mind the extra pouch you will insert later (filled with wheat or potpourri.)
 STEP 8 : SEWING THE OUTER POUCH
Cut 2 squares, slightly smaller than your softy's pouch can accommodate.
Sew around leaving an opening to invert and fill with wheat or potpourri.
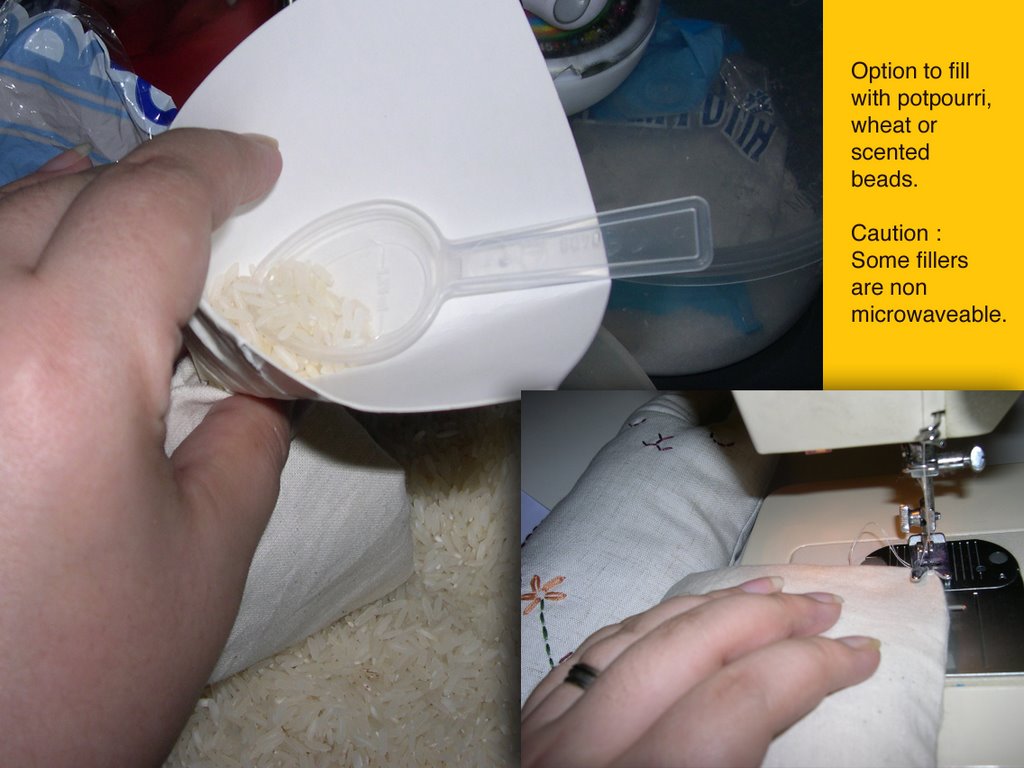 STEP 9 : FILLING THE OUTER POUCH
I use rice. The book suggested wheat, red bean or potpourri. Whichever you use make sure that you only heat the body or the outer
pouch that is filled with re-heatable fillers!!! And please, use only the microwave. An oven will burn cute little snoogem to ashes.
So, I suggest 1 minute of heating will be sufficient. Use thongs to insert into the body pocket.
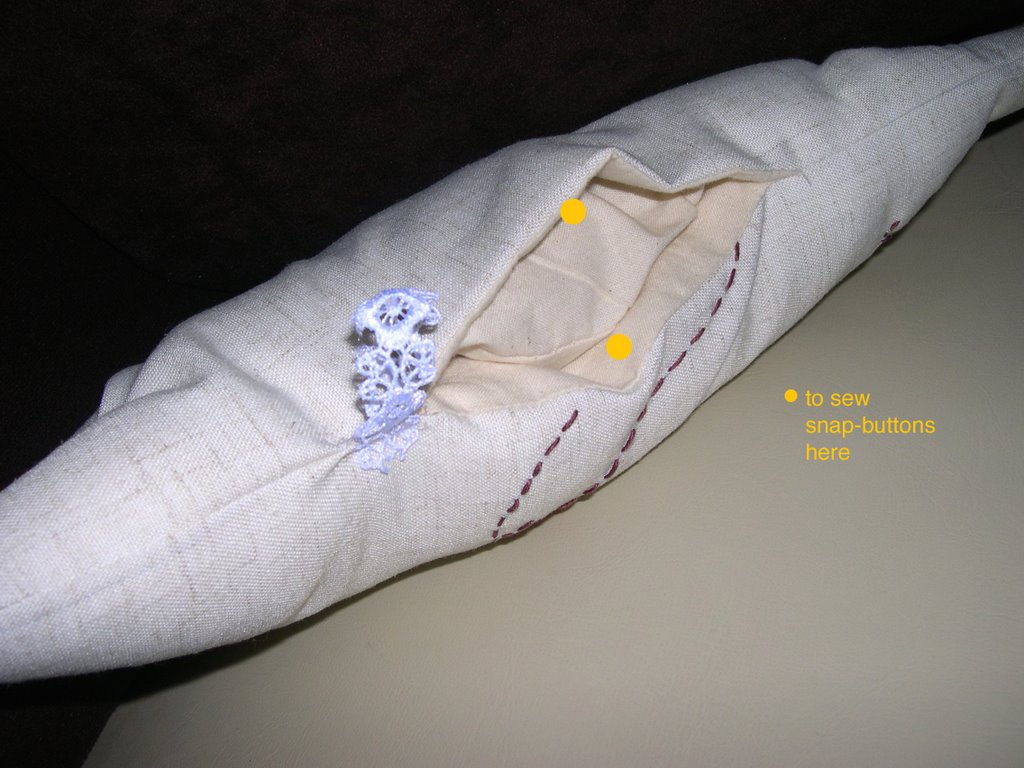
STEP 10 : SNAP-ON buttons
Sew the snap-on buttons as indicated to hold the gap of the pocket. I had a little lace sewn to the sides, just for fun.
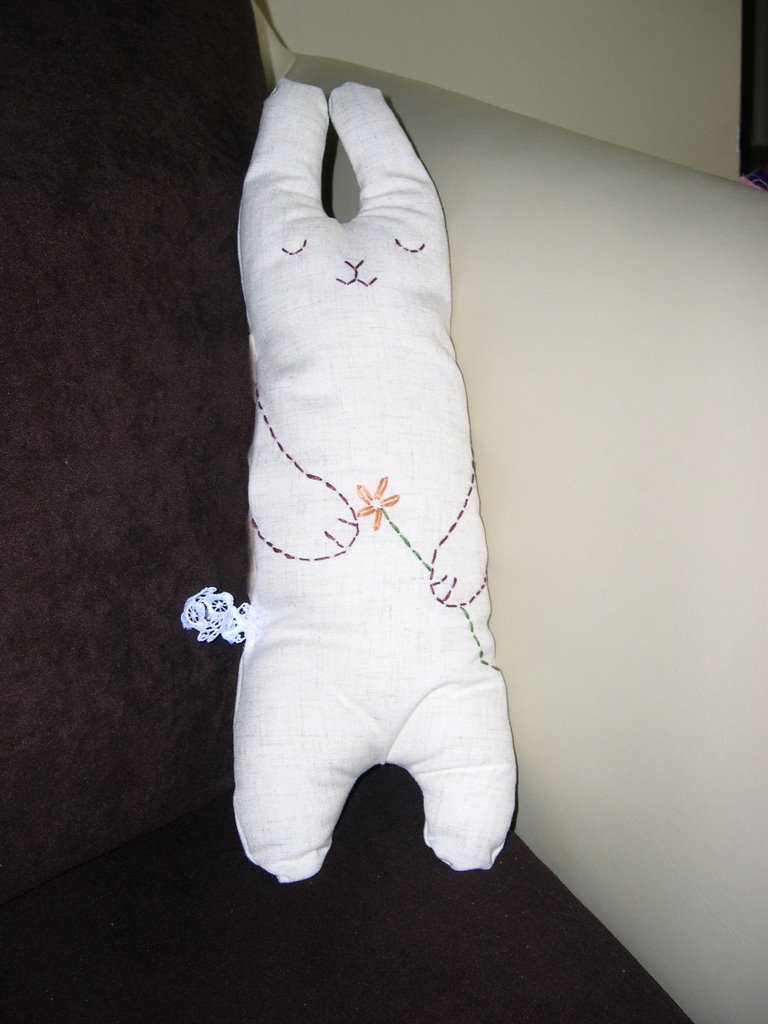
Ahhhh, little Snoogem is having a little nap.
I microwaved the outer pouch and inserted it into snoogem's pouch for a test run. Rice isn't a good idea, Snoogem smells like freshly boiled rice. So I guess next time I'll try red bean or wheat (very expensive in Malaysia!). But As the heat radiates inside, Snoogem sure is snuggly and cozy.
Have fun! One request though, please leave a comment or post to me your own Snoogem when
you're done.
20 comments:
Love her. Have included a photo and tutorial on my site. Any more great tuts let me know. Cheers
Mia
this is really fun, and great photos too! thanks for peeking in on my blog too.
Thank you so much for the pattern. I made some for my children but I used blanket and filled them with a bit of lavnder instead. Hope you don't mind but I posted a link to you. Pics are my blog if you want to see.
Thank you for sharing. So cute. I'm thinking my girls could make them-a great project for them to practise stitching on. Coryn.
Well done. I really like the design and your final product.
Wonderful tutorial - snoogem is so adorable!!!
Thank you so much for the tutorial and the pattern!
pink striped teddy and needle set
You are a genius! Thank for sharing! just wish I had time to do it....
Thanks for the tut!
hello! i just found u from someone who made a snoogem and posted ur site for the tutorial. thank u very much!! it is very cute! i hope to make one soon!!
W2eOS3 You have a talant! Write more!
LY2Qd6 Thanks to author.
LurrrrVe the Snooeyygem!!!
thanks yoonie for sharing this with us! will attempt to make one of my own for my coming baby... many thanks again!
Snoogen is adorable! The embroidery seems fairly simple, I might give it a try... thanks for the pattern!
Good JOb !:)
Hi I have just made one. It's fantastic. I love it. Was so easy to make although don't have a sewing machine. Thanks for sharing such a lovely piece. Please share more. I will make more of these maybe even a family of snoogems. Thanks again, Ambreen (UK).
oh~ I live in malaysia too! > <
this is a really nice tutorials but it seems a little too advance for me (i'm a beginner). I'll try it next time when I'm pretty confident in my skills.
thank you for this lovely tutorial ^^
btw, do u know where i can find stuff to make soft toys in malaysia? :/
thnak u again! ^^
Thank you very much for this lovely template
i've made one for my son :
http://meule-de-foin.blogspot.com/2009/06/doudou-lapin-snoogem.html
:-)
Super cute snoogem!! Thank you for sharing the tutorial. I LOVE it! ~ AngelMira
http://desperatehouselife.blogspot.com/
Post a Comment