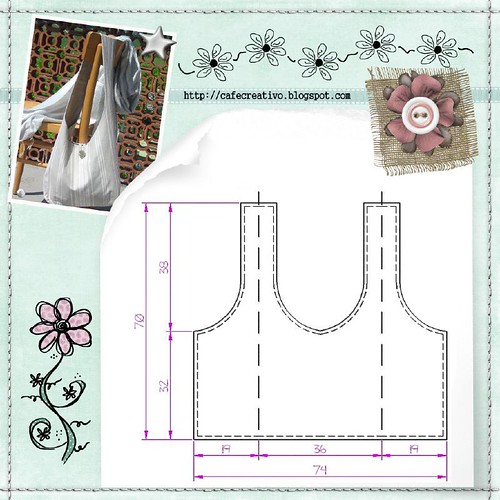
This is a simple shoulder sling tote bag. Resize the template for bigger totes. Have fun!

Thursday, July 31, 2008
Somebody Translate This!

It's a crochet pattern for a mini cookie monster!
tutorial monstruo come galletas
olvide LOS OJOS lo siento
se hace anillo magico
1.-5 puntos
2.- V en cada uno (10X)
3.- 1XV (15X)
4.- X (15X)
5.-1X /\ (10)
6.- /\ (5) rematar
Tuesday, July 29, 2008
Caramel Apple Tutorial
Found this on Flikr. Looks delicious.
This is what food hero Cat Cora says...
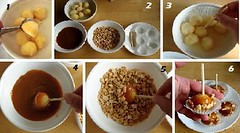
1) Wash and peel a large, fairly tart apple. I used a Pink Lady here, but as you can see it's a little dark and mealy. Next time I'll go with a good old Granny Smith. Using a melon baller, extract balls of apple. A large apple will yield about 6 balls (plus scraps for you to snack on). Place in a bowl and sprinkle with lemon juice.
2) Prepare a dipping station. I'm using mini-cupcake papers and shortened bamboo skewers (cut with kitchen shears- the remnants are great for stirring and whatnot). I also have a bowl of crushed nuts (peanuts in this case) and a bowl of warmed caramel apple dip.
3) Carefully spear each ball of apple through the ROUND end. Keep the flat end on the bottom, so they stand upright. Using a paper towel, blot off the excess lemon juice. This is important- if the apple has too much juice left on it, the caramel won't stick.
4) Dip the apple in the caramel, using a twirling motion to coat it evenly.
5) Transfer the apple to the nuts and roll, using a gentler twirling motion.
6) Stand the apples upright in the cups and let them chill in the fridge to solidify. Cute and addictive!
This is what food hero Cat Cora says...
1) Wash and peel a large, fairly tart apple. I used a Pink Lady here, but as you can see it's a little dark and mealy. Next time I'll go with a good old Granny Smith. Using a melon baller, extract balls of apple. A large apple will yield about 6 balls (plus scraps for you to snack on). Place in a bowl and sprinkle with lemon juice.
2) Prepare a dipping station. I'm using mini-cupcake papers and shortened bamboo skewers (cut with kitchen shears- the remnants are great for stirring and whatnot). I also have a bowl of crushed nuts (peanuts in this case) and a bowl of warmed caramel apple dip.
3) Carefully spear each ball of apple through the ROUND end. Keep the flat end on the bottom, so they stand upright. Using a paper towel, blot off the excess lemon juice. This is important- if the apple has too much juice left on it, the caramel won't stick.
4) Dip the apple in the caramel, using a twirling motion to coat it evenly.
5) Transfer the apple to the nuts and roll, using a gentler twirling motion.
6) Stand the apples upright in the cups and let them chill in the fridge to solidify. Cute and addictive!
Monday, July 28, 2008
For Paul : Creative Exchange 2008
The rules were simple, all that was needed was a 7" x 7" square of fabric and within a 5" x 5" perimeter decorate the square with anything you can think of. The organiser of this exchange MW also insist that we must have a heart embellished within the creative square. I used felt as the main fabric of choice and decided to add a shrinkable plastic ornament. My partner was Paul and yep, he's my first exchange to a male partner! (So I've to think masculine colours and theme...LOL!)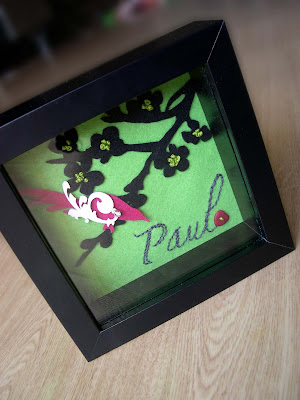 The embellished piece was framed with an Ikea black 3D frame.
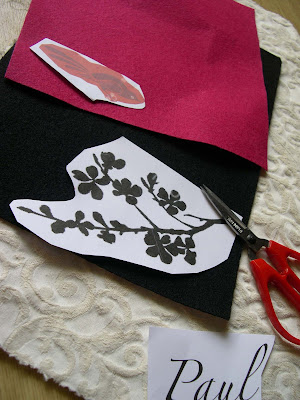
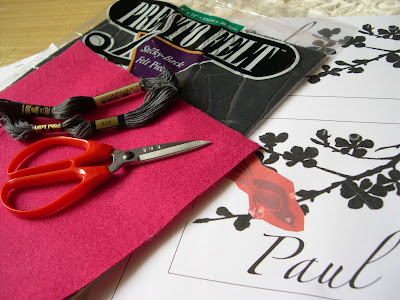 I bought the adhesive felt from Artfriend at Megamall. Very nice to use, but bear in mind, it's not washable! I found some nice motives on the net and composed a picture with Paul's name on it. Had it printed and ready to cut.
 Attaching the pieces to felt.
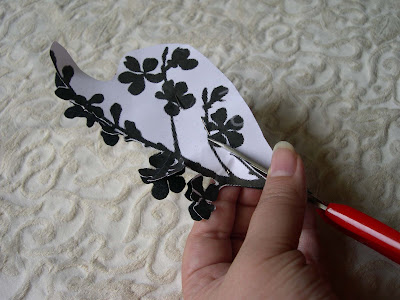
 Cutting the tree branch was not easy. The thinner the branch, the more delicate it becomes. Thank goodness for the adhesive backing.
 The branch taking shape.
 This is how the backing looks like. I peeled a little off to show you the sticky side.
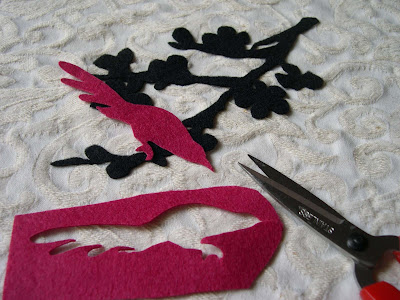 Cutting the bird and arranging it before pasting it into the felt green piece.
 I backstitched Paul's name and embellished it with a heart button, a shrinkable plastic ornament for the wings and to secure the wing to the bird a little diamond bead. I also embroidered some french knots to the branches for a more 3D effect.
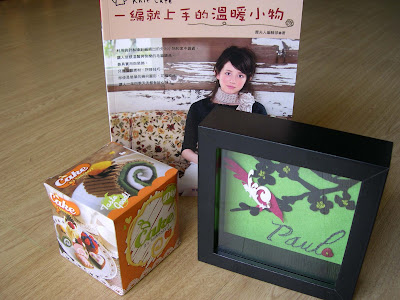 My exchange to Paul, plus the book I got him earlier on and of course, this cute little box kit on making your own felt desserts from Living Cabin (Love that shop! It's got everything cute). I hope he likes the exchange!
 The embellished piece was framed with an Ikea black 3D frame.
 I bought the adhesive felt from Artfriend at Megamall. Very nice to use, but bear in mind, it's not washable! I found some nice motives on the net and composed a picture with Paul's name on it. Had it printed and ready to cut.
 Attaching the pieces to felt.
 Cutting the tree branch was not easy. The thinner the branch, the more delicate it becomes. Thank goodness for the adhesive backing.
 The branch taking shape.
  This is how the backing looks like. I peeled a little off to show you the sticky side.
 Cutting the bird and arranging it before pasting it into the felt green piece.
 I backstitched Paul's name and embellished it with a heart button, a shrinkable plastic ornament for the wings and to secure the wing to the bird a little diamond bead. I also embroidered some french knots to the branches for a more 3D effect.
 My exchange to Paul, plus the book I got him earlier on and of course, this cute little box kit on making your own felt desserts from Living Cabin (Love that shop! It's got everything cute). I hope he likes the exchange!
Thursday, July 17, 2008
Tutorial : Felt Flower Pins for Summer!
 I've made a lot of felt flower pins in the past 2 years (3 whole shoe boxes!). And I have added them to exchanges and sold them separately to crafters who are as obsessed with felt crafts too. Here's a simple and basic felt pin I love to make with leftover felt and yarn. They're fast to make and you can make all kinds of variations from this basic form. Have fun! And don't forget to leave a comment and send me some pictures!!!
 Here are things you'll need. You'd probably have all these things in your stash already. I've some leftover yarns from my crochet cupcakes and it's a waste if I don't use them. Felt, yarn, pin backing, your sharpest pair of scissors, buttons of sorts and good ole tube of UHU or any glue you use with felt. Glue guns work fine but you've to work quick! If not, the sewing on the glue will be quite impossible!!
 Cut a strip of felt around 4" thick (the thicker the bigger the flower) and 8" long in your favourite colour. I love this turqoise colour.
 Spread a line of glue as shown on one side of the felt piece.
 Fold down and lightly press.
 Don't wait for the glue to harden and snip strips on the folding. Not to thin, or your petals will just fall out. Not too thick, or your petals will be too lumpy. : )
 Spread another row of glue at the ends.
  With your leftover yarns (use any contrasting colours you like) line them as shown here. Start about an inch away from the left end (this ensures you have a space for your button). Making sure the yarn does not flow out to much on the top and keep the bottom neat.
 Snip off the end.
 Another thin row of glue on the top of the felt and yarn.
 Start rolling from 1" space at the end.
 Snugly and with your fingers try to tap the bottom lightly so that it is even.
 This is how the bottom looks like. Yarn should not be jutting out on this side.
 To further secure your roll. Stitch a few lines here and there to secure the joining felt and yarn.
 Attach button of your choice with yarn or any thick embroidery thread.
 Cut a circular piece of felt that fits the bottom of your flower.
  Attach felt and pin backing with glue to the flower.
  And you might just end up with a stashful of these wonderful felt flowers like I did! Enjoy!!!
Friday, July 11, 2008
Shhh! Camping in the Living Room.


The only reason he's agreed to sleep on his own is the fun sleeping in a tent. It first began with a makeshift tent made out of bedsheets and some fabric from my stash. The first night was fun and he decided to try his pop up tent for the 2nd night. Here he is two nights sleeping on his own... two nights and in a make believe camp site right in our living room! Looks like I've to clear his room and tempt him to sleep on his own entirely. Our bed is getting a little crowded!
And here's Nigel learning how to crochet. He managed a few chains but that's about it. He's not given up, still bugging me for yarn to 'sew'.
Subscribe to:
Posts (Atom)