I was so busy I've neglected my blog for awhile (Thanks, Josie for reminding me!), but I'm back and here's why I've been busy as a bee. There is a shrinkable plastic bangle that I've wanted to post about but have yet to get really nice photos for it. (Did I mention about my other obsession with bangles? LOL!) There are quite a few pieces of crochet projects that are works in progress. I think you'll realise that I like to work a few projects at one go. That's just simply my way of rotating between projects. The following months will be quite hectic for me, as my little bro is getting married in November and there has been some serious planning and preparation work going on (and dieting!!!!). Sketching and dreaming about the wedding cake. Backdrop and the little details. You see, Victoria and me have this weird obsession with victorian motifs and we intend to use it as part of their wedding theme. Will post about it in stages. Keep in touch! Oh yes, I'll be giving out a surprise gift end of this month - Will let you lovely folks know the details soon!!
 Found a pattern on the net and enlarged it to fit an A4 sized shrinkable plastic sheet. Cutting the pattern was a challenge. I used both scissors and blade. Pop it into the toaster over and shaped it to fit the bottom of a glass bottle (it's a wrist bangle - so you may need to refit it as you go on your own wrist. Careful, it can get hot) You can always pop it back into the oven and reshape until you get the right size. Once you're done, simply wash away the print with water, yep, it rinses right off. If you intend to have patterns on it permanent, I suggest a fixative spray or modge podge will do the trick to seal the inkjet prints. (Do not use shrinkable plastic on laserjet printers, disastrous!!!)
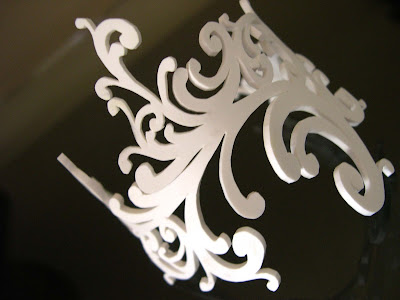
 Elegant, isn't it? Have quite a few more patterns to try out. I've to look for bigger sheets of shrinkable plastic first.
 The other side of the bangle. I think a tiara would be nice to make with this method too.
 Side view. Look how delicate the tendrils are. You'll be surprised to know that this material is super flexible and will not break even if you drop it. It'll take some effort before a tendril can be snapped off.
 Some ongoing crochet projects. I love the colours!
 A scarf out of variegated Minlon yarns. This is 100% acryllic.
 This is the scarf I've been making for my sis from Paul's yarn exchange. Thanks again Paul, it's almost finished!!
 Base of a tote bag I'm making for Eirene. I think it's her birthday coming up and Oh boy, I'd better finish this quick!!!
 This is a tote I experimented with 100% wool yarns. Very expensive lah!
Come back for my next posting! Will start my mini giveaway next week!!! Hugs!

 It's a gloomy afternoon today and I was inspired to post a tutorial to brighten your day! I've been wanting to do this after collecting a couple of plain hair bands and with some new felt pieces I bought from Artfriend, it was just the perfect embellishment piece. It's super easy peasy to do and it took me only about 10minutes (that I guess will depend on your cutting skills too!). Download the template and start on it right away!
 Right click and 'save as' the template. Print on an A4 piece of paper. Enlarge as you please. I won't recommend you to reduce the size since the smallest piece will be too small to cut.
 The printed template. You will notice a full bloom image on the left hand top corner. Don't cut that, it's just a guide for you to stack your pieces.
 Things you'll need : Felt piece with colour of your choice. I fell in love with this fuschia pink and I opt for a bright lime green for the leaf. A barrette (optional unless you just intend to glue the flower straight to the hairband. In this case, I prefer to use a barette so I can pin the flower anywhere else eg. a bag or direct onto a ponytail.) A hairband that matches.
 I'm using felt I bought from Artfriend at Midvalley. They come in A4 pieces and lots of nice colours. They're ecospun from recycled plastic bottles!!
 Cut the template pieces out. Don't have to be precise here.
 Arrange on felt piece. Use a couple of pins and start cutting!
 Very easy to cut if you have them securely pinned to the felt.
 Stack the pieces using the template as a guide.
 I decided to change the button I was going to use. This is a vintage cherry blossom button from Alice's shop.
 Sew the button and the stack of felt together.
 After a few securing stitches. Start sewing a few rounds on the spine of the barette.
 Remove the tension bar on the barette. (Yes, they're removable!!)
 Cut a small square piece of felt and glue the spine to secure the barette to the felt bloom. Reattach the tension bar on the barette. Leave to dry for about 20 minutes.
 Use the barette as shown on the hairband. If the hairband is too thick, just remove the tension bar on the barette and try again. I think it's best you try the barette on before attaching the felt bloom. Sometimes the hairband you have may not fit, you can also get varying sizes of barettes to match.
 The finished bloom attached to the hairband. It's a nice gift for someone sweet! Have fun and do let me know if you attempt to make one of this. I'm glad most of you enjoy my tutorials and I love to hear from all of you. Thanks for being a part of my crafting madness! LOL!

 Found a pattern on the net and enlarged it to fit an A4 sized shrinkable plastic sheet. Cutting the pattern was a challenge. I used both scissors and blade. Pop it into the toaster over and shaped it to fit the bottom of a glass bottle (it's a wrist bangle - so you may need to refit it as you go on your own wrist. Careful, it can get hot) You can always pop it back into the oven and reshape until you get the right size. Once you're done, simply wash away the print with water, yep, it rinses right off. If you intend to have patterns on it permanent, I suggest a fixative spray or modge podge will do the trick to seal the inkjet prints. (Do not use shrinkable plastic on laserjet printers, disastrous!!!)
 Elegant, isn't it? Have quite a few more patterns to try out. I've to look for bigger sheets of shrinkable plastic first.
 The other side of the bangle. I think a tiara would be nice to make with this method too.
 Side view. Look how delicate the tendrils are. You'll be surprised to know that this material is super flexible and will not break even if you drop it. It'll take some effort before a tendril can be snapped off.
 Some ongoing crochet projects. I love the colours!
 A scarf out of variegated Minlon yarns. This is 100% acryllic.
 This is the scarf I've been making for my sis from Paul's yarn exchange. Thanks again Paul, it's almost finished!!
 Base of a tote bag I'm making for Eirene. I think it's her birthday coming up and Oh boy, I'd better finish this quick!!!
 This is a tote I experimented with 100% wool yarns. Very expensive lah!