Here's Tini (on the right) posing with the bag after the lucky draw. Alynn is on the left showing off a lovely cushion by Sabariah.
 The crafting tote : Denim and Canvas.
 A special tag for the gift.
 I made this little house of buttons for Sabariah, a little hostess gift. I downloaded the pattern from an etsy seller : fantastictoys. They have lots of other templates which you can buy and print on your own.
 A glimpse inside the tote bag. I used an apron to for the yellow canvas. It's cheaper to buy and find a ready made canvas apron than buy bright orange canvas here!
 The paper cupcake house taking shape.
 The gifts all ready packed for the lucky draw.
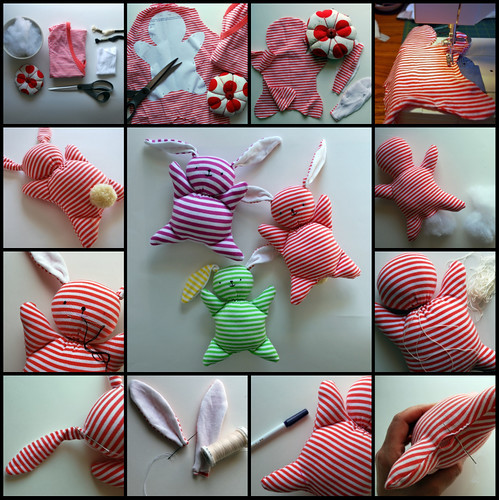
 I bought this nesting box of teddybear in Bangkok. A little tag for the felt flower box.
 I love the way my peony felt turned out. This time I fused fabric and felt together with fusible web. Although a tad expensive here, they do come in handy!
 This peony template or tutorial is featured in my previous post. Just click the link on my right bar. I even made the button. Very easy peasy if you have the gadget from Daiso. The fabric is actually a hankie I bought from Watsons. You'll find beautiful fabric everywhere if you're like me, constantly on the lookout for good fabric finds in the most unlikely of places! LOL!
 I secured the felt flower with a few stitches to a brooch pin. And Superglued it for better security!
 The whole set : 1 handmade item + 1 felt flower as required for the exchange!
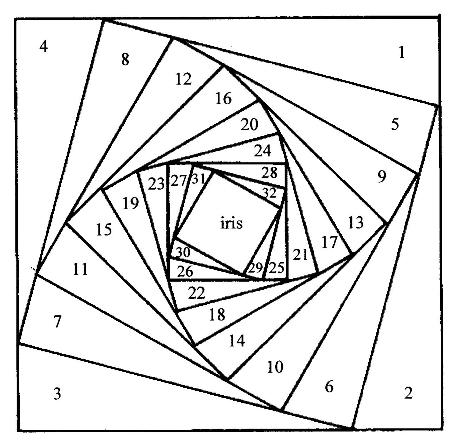
 After watching the tute on youtube, I thought it would be great to have it done in bias strips. The ones you can buy in store so you don't have to spend hours making them. They come in a rainbow of colours and around RM1-2 per pack! I printed the template and have it mounted face up on a styrofoam box or any piece of cork sheet. Using 4 pins to pin the template to the syrofoam temporarily. I then created a border of stickiness using double sided tape to tape 1 inch away from the template. This will hold your bias strips and allow a space to sew them together. You'll know what I mean when I fuse the whole entire iris folding piece.
 Gradually paste the bias strips according to the numbers. Folded side facing upwards. Make sure your bias strips overlap neatly and all the way more than 1" the border of the template. Adding double sided tape as you go. The tape will be cut away eventually, think of them as sticky hands holding on to the bias strips until you're ready to cut them after sewing the borders. It can get messy but no worries, a kaleidoscope is taking shape on the underside. Gradually work the colours as desired. As for mine, I wanted a burst of sunshine, so I worked gradually from yellow tones to warm red tones.
 Finishing the last few strips and making sure you cover every visible lines of the template. It looks messy here, but wait for the reveal! This took about 6 packs of bias strips and in less than 30 minutes. You can't do this halfway and leave it for another day, the double sided tape will only hold that long! LOL!
 Cut a square of fusible web 1" bigger all round of the Iris folding template. Do the same with a plain piece of fabric. Layer fusible web on top of the bias strip (remember to remove backing paper!!!) and the plain piece on top. Your kaleidoscope sandwich now consists of the following in order from the bottom (Your paper template + Bias Strips + Fusible Web + Plain fabric). With the iron on low begin to iron the middle of the plain fabric when it is still mounted on the styrofoam board. Careful you do not iron the styrofoam! Once the fusing takes place, carefully lift the entire kaleidoscope sandwich by removing the pins holding the template. Continue to iron the sandwich until you feel that it is all binded. Avoid ironing on the double sided tapes. It will be cut away and when melted can be quite messy. Do not be tempted to peek inside by opening the sides or peeling. Trust me, the magic is already happening!
 With the template as a guide on the underside. Sew on the template outline and trim the excess. Use a good pair of scissors, please!
 Tada! Gently peel of the paper template to reveal your Iris folding bloom!
 Now to find matching fabrics to make the crafting tote.
 I cannibalised a new bright orange apron I've been keeping for ages for this. Like I said it is near impossible to find bright coloured canvas in Malaysia so this was perfect for this kind of projects. Working with a lot of pins I pieced the front of the bag like this.
 The denim went very well with the canvas. It took me 2 days to figure out what type of handles to give it. Whether it should be one long length or a double strap...but at the end...
 No plastic or metal buckles, I find they take away the aesthetics of a handmade bag! So it's a simple over the shoulder strap and the only metal used is the magnetic closure inside. The lining is from Ikea, love the fabric combination! I used up the entire orange apron inside of the bag too. Say you'd try it too??