Thursday, July 29, 2010

Tea-Towel Cupcake Tutorial

I made these as little gifts for a housewarming gathering recently. They're little Tea-Towel Cupcakes aka towelettes disquised as cupcakes! LOL! Have fun making them!

These are the supplies you need : Circle Puncher | Red and Green Scrap Paper | A Leaf Puncher | Ribbons | Paper Cupcake Liners | Toothpicks | Double Sided Tape | Small Hand - Kitchen Towelettes | Packaging Plastics.

The size of your towels will determine the size of your cupcakes. They're supposed to be daity, so pick rectangular towels. I actually did one at the store to determine the right size (one that fits a cupcake liner. Do this if you don't want to end up with 2 dozen towels that are wrong in size!

I chose these lovely ribbed kitchen towels. They have a beautiful texture and only RM2 each from Jusco. Usually towelettes come in sets of 4s and 5s and in a range of coordinating colours. Pick one according to your colour theme. And yes, rectangular ones work perfectly. You'll see what I mean.

Prepare the cherry on top. Punch red circles (the cherry on top), or if you have other cute punches, other printed cupcake toppers will also do. Punch leaves. Enough for the amount of towels you have. Use a double sided tape and sandwich a toothpick with the leaf in the middle. Press and set aside.

Don't they look cute already! Make enough for the amount you plan to have. Use your imagination, you can use beads like gumdrops, or a lollipop too.

Here comes the tricky part. It's not that hard once you get the first one right. Almost like origami or linen napkin folding. Spread a towel on a flat surface just like on the picture.

Fold the top and bottom of the towel to the middle.

Fold again into the middle. The height of the teatowel cupcake is determined here. So use your noodles and figure out a good height. No worries, you can undo the towel and try again.
In one corner fold down to make a triangle.
Pick the folded down corner and fold upwards to make the triangle thicker. Making sure the pointed triangle is slightly jutting out of your line of towel. This will form the peak of your cupcake.
Roll around the peak once. You'll find that the towel will slant a little. This is good and natural for the next step.
Tighten the roll as you go. Now, fold the band of towel outwards as in the picture. Continue the roll and folding outwards as you go.

Rolling...
Wrapping...
Now the towel looks like a big dollop of cream. Hold firmly.

Tie a ribbon slightly above the last fold to secure. I find gross grain ribbons work better. The silky ones require a lot of skill since it is slippery. I struggled at first, but you'll get the hang of it after the 3rd and so on. If not, get a nimble assistant to tie the ribbon while you hold on to one.

Push the cherry sticks on top and place them on a cupcake liner each. Easy-Peasy, Super Cute!
This is a horrible picture, but the plastic was so reflective. I wanted to show you how you can pack them in nice little glass packages and topped with a neat label.
HAPPY CRAFTING! Do let me know if the tute was helpful and maybe share with me some photos of your own Teatowel Cupcake creations!!! Hugs!!!!

Friday, July 23, 2010

Come Over for Desserts?

What is a housewarming without desserts? It was totally a sweet affair! Two Saturdays ago and I'm posting about it only now. Must be all that sugar. We had lunch out in a nice chinese restaurant and we planned a hi tea dessert stop over at our new house. Simply because I can't do lunch for more than 20 people, but desserts are just too fun to miss out on the challenge.
I started baking at 5 in the morning. Now I know how early my Aunt Josie wakes up to bake so that we have fresh baked cakes and desserts for our Sunday dinners.

These are my first attempt at cupcake baking and icing piping and fondant playing! The orange poppy seed cupcake turned out fabulously pretty and yummy!!! I made the fondant butterflies a few days ahead. Fondant is not so forgiving in tropical climate...I think putting an air cond in the kitchen might help.
Don't they look store bought? I like fondant!

I also made these....mmmmm Honey Macadamia cupcakes with cream cheese topping! These made my kitchen smell so good in the oven. And at 6 in the morning, that's just heavenly.

I left the drizzeling of honey out on the topping since I'm only serving this in the afternoon. I left the whole batch in my studio with the aircond on.
Added some fondant flowers. I used a plunger type of mould so it was really easy to make tiny tiny bits of flowers for deco.

This were taken a day after. The poor fondant just melted.
LOL! I just wanted to show you the macadamia topping!

I also made Tiramisu!


We made a short visit at the florist shop in Chinatown and bought wholesale roses, crysanthemums, and orchids for the house too.

Orchids on the piano top. These were very delicate. They lasted only 3 days.

Love the paper mums! Very hardy but I think they're usually for altars. They look so pristine and serene.

I had flowers on the dining table and the TV console to brighten my living room.

Learnt this bunching technique from sifu Victoria!

You must be wondering at this point, how come there aren't any photos of people...My cameraman was too busy having his cupcake! LOL!


Made 2 dozen of these for doorgifts. The tutorial is up in the next post. Keep a watch for it!

Thursday, July 15, 2010

Sugar Puffs, Anyone?

They're so cute! I've been keeping this pack of frozen puff pastry in the freezer for a rainy day bake with Nigel. Although he doesn't fancy danish pastry, he sure finished this batch.

First we prep the cutting board with a little flour.


Have all the things you need laid out on the table. An egg yolk, sugar sprinkles, flour for dusting, cookie cutters and roller pin. Make sure the frozen puff pastry is thawed and soft to touch but not too mushy.

These cookie cutters we bought in Isetan, they have a little craft corner. Lot's of clay modelling supplies, Japanese papers and cute stationery. I think I know every craft corner in the city of Kuala Lumpur!

Pick a piece of puff pastry onto the floured board and with a rolling pin flatten as desired. Nigel is doing a fantastic job here.

Pick a cookie cutter and start cutting. Try to minimise wastage.

I prefer to use a non stick baking paper that comes in a roll over buttering the pan. But it's totally up to you. I find this less oily and less mess.

Time to coat the cut outs with a little egg yoke for a shiny golden finish.

Ooops! Too much, but nevermind. Puff pastry are quite forgiving.


Sprinkle some bakeable coloured sugar for a magical touch.

Can I have some now?


Put them in the oven to bake. There are baking instruction on your packaging. So different brands have different bake times but ours was just at 170c and 10 minutes. They bake really fast. Don't open the doors when the pastry rises. You'll know when they're done. Golden brown and the kitchen smells heavenly!


Go ahead, have some sugar puffs!

Monday, July 05, 2010

A Busy Week : School Holiday Projects & Fund Raising

Right after my moving house phase we went full crafting speed ahead. There were lots to do! Nigel's school assignment was to create an animal themed scrapbook and we had the school hols to do it up before the report card day the Saturday after. And the school was organising a food fair on that day itself and each parent was to contribute a food item for the sale. I offered to bake cupcakes, but some of the parents have already taken up the task. So of course the next best thing I do came in mind!
Here's Nigel busy cutting some images. We downloaded from all over the web, we talked about the concept and the crazy little ideas we want inside the scrapbook.
More cutting! This is good practice, I'm proud of him for handling the scissors like an expert.

Crazy ideas also include sticking googly eyes on the colourful parrots we found. That's the cover of his scrapbook titled : GOD'S SAFARI. Here he is making up the layout as he goes. I'm there shaking my head or nodding if it's alright to put this here or not. LOL!

More cutting! We took about a week to assemble the whole scrapbook. It was made entirely of a brown box material I cut from one of those big huge boxes we used for moving house. Had the file rings to hold them together.

Thank goodness for roller glues! No more sticky fingers and yucky mess with the conventional glue. Just roll and stick! I found quite a good selection at our local stationery shop. They look like white roller wipers but instead of correctional tape, it's glue tape!!! Wonderful invention!!!! Buy the refillable ones.
Positioning was quite easy with the roller tapes. And they stick dang well! We had a shark tooth attached to one of the pages (I hear someone took it away during the exhibition!!! So angry at people who can't keep their hands off other people's property!!!! See no touch & take!!!!!) I also stuck a piece of paua shell on another page. This was pretty stuck since I used UHU glue, so it remains intact, I hope. Don't have pictures to show of the inside, Nigel had to pass up his homework so will have to wait when it returns.

Nigel had some pop ups inside as well. I made him write notes here and there to explain some of the things about the animals. It turned out quite well, hopefully the book comes back intact and with not muct to repair. It's really a big huge project for the 2 of us.

Meet Buttons! I made him just for this funfair. I've made many softies, but by far, this is the cutest. I named him buttons, he has buttons for eyes, and button attachments for arms!
Taking over the piano. All the cut outs I assembled for the other buttons. The prototype looks a little lonely here. Body parts everywhere.A close-up of Buttons no.1. My label reads the Buttons, The Cuddlesome Lamb!
A close-up of Buttons no.1. My label reads the Buttons, The Cuddlesome Lamb!

The mess on my dining table.

The mess on the floor. I have a lot of extra fabrics I keep and hoard. It's a sickness we all share!

And this is my favourite! Save-For-A-Rainy-Day coin pouch. I had the smile handstitched and stuck the googly eyes on. Can't resist the ribbon! Wait for the buttons....

Ooooh. Did I tell you, I have a pair of scallop scissors that works beautifully on fabrics and pvc as well!!! I love scallops.
Coin pouches in all the yummy colours.
I even had matching button grips for the zippers.
Buttons half ready. They are beginning to look so cute.

 More half done Buttons in a row.
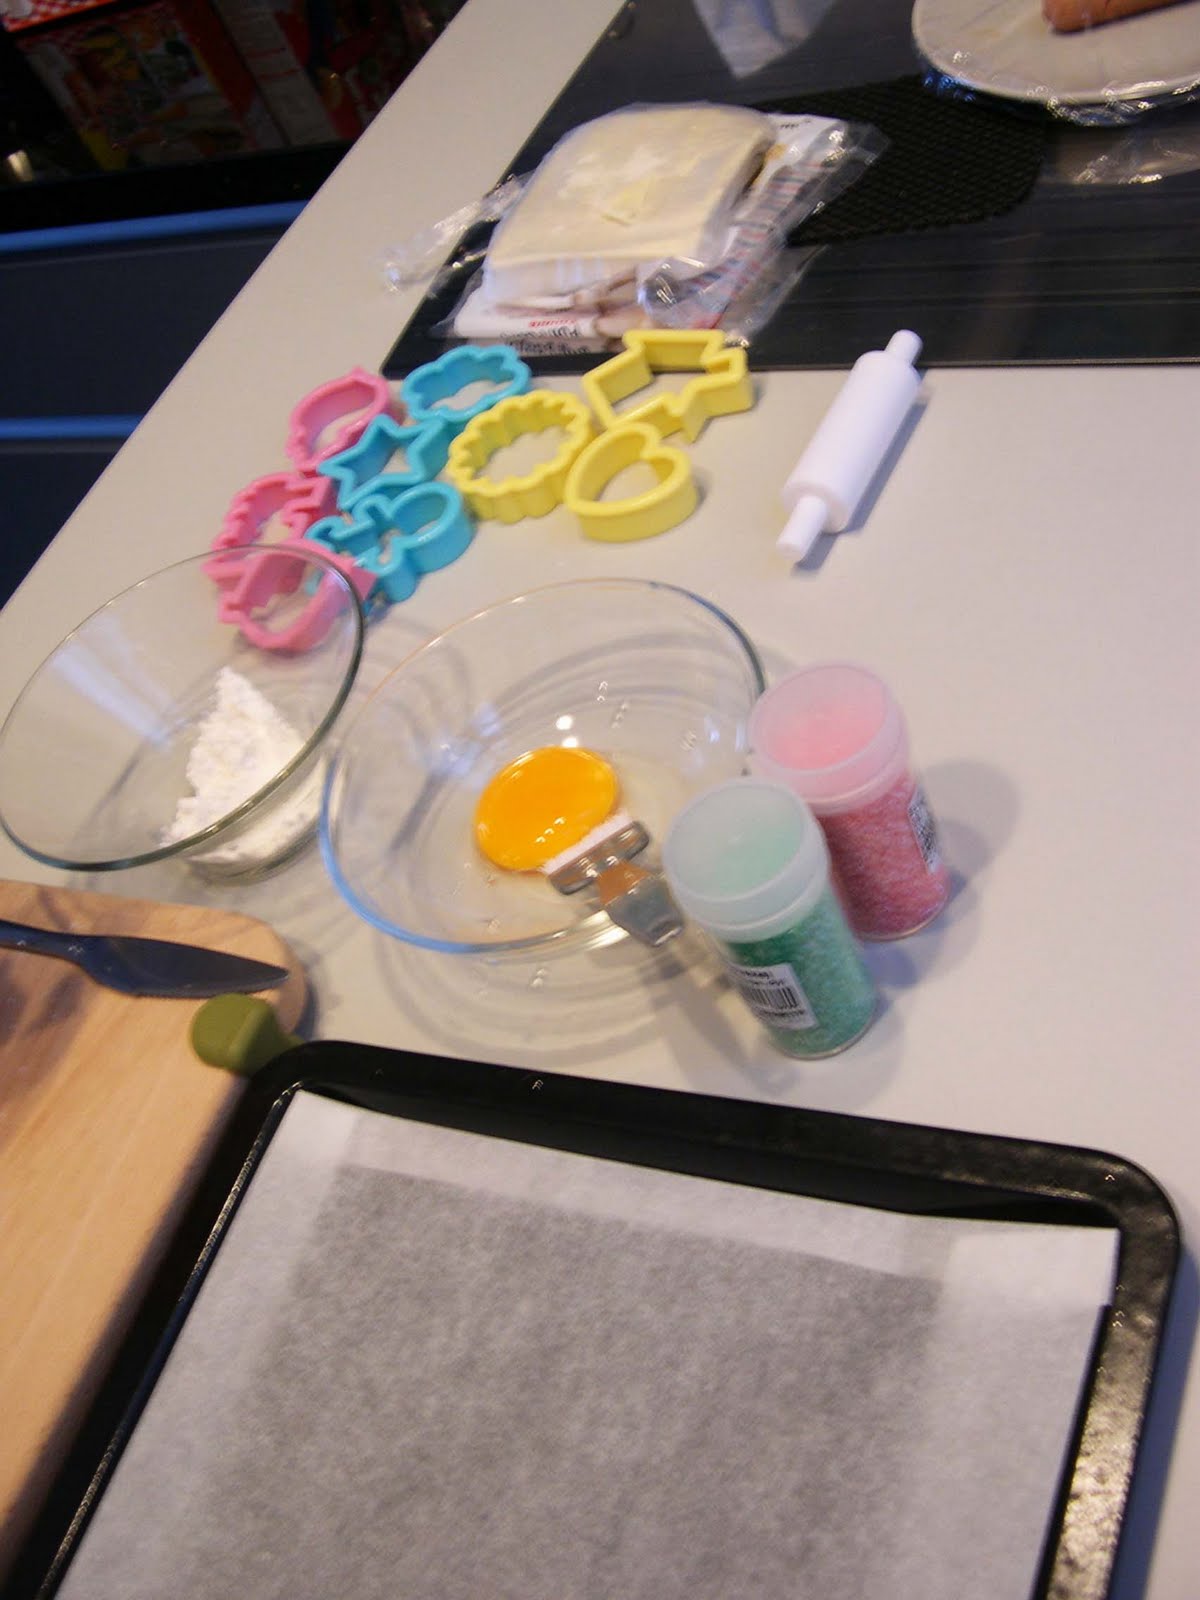
While taking a break I worked on these...
It's the same coin pouch template but a few times bigger.

In between sewing the softies and the coin pouches I started on another softie. (That's me, I have to shift around doing other things to keep myself focused. Weird eh.) This is a cloud pillow. My label reads 'Take a nap on a cloud'

More cloud pillows. I made 8 of these and sold 6. They were quite bulky and taking a lot of display space, but it's supposed to be all poofy and soft mah. 

 Don't they look so CUDDLESOME!!!!

This is my favourite orange one. Although I sold all the pink ones first, I still like this orange one. Pink does sell!

I also made old-school ponytail holders with the buttons from my studioshoppe. I made a lot of these and it was really fun. There's trick to tying these and I learnt them from Martha Stewart's Kids magazine. I miss that magazine!

I also made a few organza pins. Peach blossom pins that turned out fabulously weddingy! Sorry not close up of these beauties. Will do that when I make more of them.

Guess what's this??? LOL! Marshmallow pops. We sold lots of this. This is the process... Prepare the skewers with a little tape around 2 inches away from the top. This will prevent the cupcake papers from sliding downwards. I pre-poked holes with a pin on the paper cups beforehand. Slide one on the top right above the tape.
I melted chocolate on a bowl using a makeshift baine marie. It's important you do not get your chocolate wet with water vapours. It will melt slowly but wonderfully.

I got 3 kinds of sprinkles. Marhmallow pops are a little naked without these.

Getting my workstation organised. You need lots of cups to air-dry the marshmallow pops. Make sure they are tall and deep enough so that they don't topple over.

 Poke a marshmallow at the end and deep into the chocolate.
 Yummy! Now sprinkle on some magic and voila!!!

 Should have made more of these to sell. They sold out! Some even came back for seconds! But at the back of my mind.. what if I don't sell all of them? (Nigel would have a grand day eating them all!!!) Oh yes, I had them neatly packed in glass paper with scallop edging. It was a busy week but not bad for a week of crafting, our stall made quite a lot of money that day!